
Flow Cytometry Sample Preparation
リンク
- Introduction to flow cytometry
- Flow Cytometry Applications
- Flow Cytometry Fluorophores and Dyes
- Flow Cytometry Multicolor Panel Design
- Flow Cytometry Sample Preparation
- Protocol for studying extracellular and intracellular proteins
- Experimental protocol to study cell viability and apoptosis
- Popular antibodies for flow cytometry
Flow cytometry sample preparation
As in any antibody-based technique, biological samples require preparation prior to staining and analysis. Cells require disassociation and are often fixed and permeabilized when analyzing cytoplasmic and nuclear proteins. Samples need to be washed after staining to remove any excess of unbound fluorescent reagents. Please refer to our experimental workflow (Figure 4) and sample preparation table (Table 3).
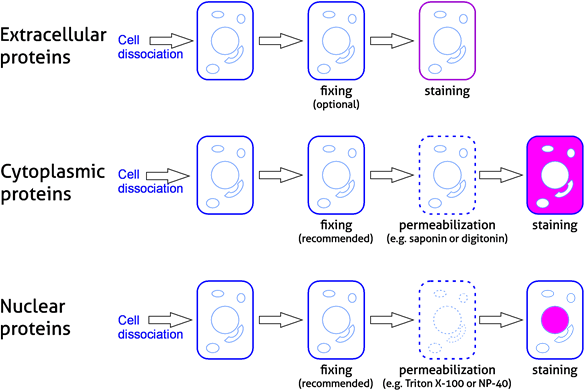
Figure 4. Experimental workflow for analyzing protein targets in flow cytometry
Table 3. Sample preparation steps in flow cytometry experiments.
| Sample preparation step | Description and tips |
| Cell dissociation |
|
| Fixation |
|
| Permeabilization |
|
| Incubation with fluorophores, dyes, or antibodies |
|
| Washing |
|
The proper execution of sample preparation steps helps to reduce noise and ensure good-quality data are obtained. The presence of many dead cells, cell clumps, and high cell autofluorescence can usually be avoided. For example, the presence of dead cells can be spotted by analyzing FSC vs SSC plots – dead cells have low FSC and high SSC compared to live cells. It is good practice to include viability dyes in experiments as this provides a definite method of excluding dead cells from analysis. Dead cells are particularly sticky to antibodies and can therefore significantly influence and falsify results if they are not excluded.
It is also important to optimize the dilutions of antibodies and other probes used for staining. This not only allows the saving of reagents but also reduces the background from non-specific binding. The correct dilution depends on the antibody affinity to the target and target abundance. Very high dilutions are recommended for abundant targets. As seen in Figure 5, it is possible to easily discriminate between CD4-positive and CD4-negative lymphocytes stained with even very high dilutions of the anti-CD4 antibody.
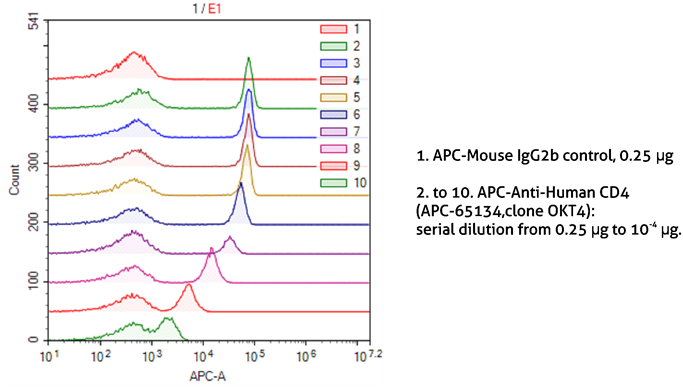
Figure 5. Dilution of antibodies for sample staining in flow cytometry.
1X10^6 human peripheral blood lymphocytes were surface-stained with APC-Mouse IgG2b isotype control (1) or APC-Anti-Human CD4 (APC-65134, clone OKT4) using 2-fold serial dilutions (2-10). Samples were not fixed.