
Western Blot Protocol
リンク
- Western Blot Protocol
- How To Optimize Your Western Blot
- SDS-PAGE Gel Recipes
- How To Optimize Your Results With Low MW Proteins
- Tricine Gel Recipe For Low Molecular Weight Proteins
- Choosing The Right Lysis Buffer
- Choosing The Right Western Blot Detection Method
- Western Blot Troubleshooting: Why Does The Observed Protein Molecular Weight (MW) Differ From The Calculated One?
- Western Blot Troubleshooting: High Background
- Western Blot Troubleshooting: Weak/No Signal & Other
- Western Blot ppt
- Western Blot Video Protocol
SDS PAGE
-
Construct an SDS-PAGE gel according to the molecular weight (MW) of your target protein(s). (For recipes see the "SDS-PAGE gel recipes" section)
-
Prepare samples in microfuge tubes. Add 4X SDS sample buffer so the total protein amount is 30 - 50ug per sample (according to the protein amount measured by Bradford or BCA protein assay).
-
Flick microfuge tubes to mix samples, spin them shortly, and then heat to 95 - 100℃ for 5 minutes.
-
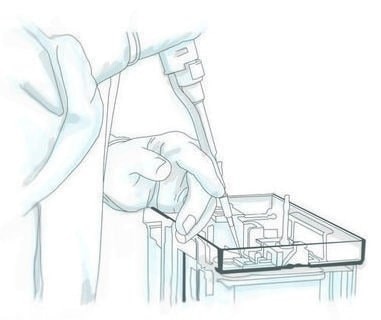
Set up electrophoresis apparatus and immerse in 1X running buffer. Remove gel combs and cleanse wells of any residual stacking gel by pipetting running buffer up and down in each well using gel-loading tip (Figure 1).
-
Load samples and appropriate protein markers onto the gel using a tip.
-
Place the lid on the gel tank. Turn on electrophoresis power pack and set to a low voltage (as the sample runs through the stacking gel), increasing to a higher voltage (e.g., 120V) when the dye front reaches the separating layer. Stop the gel running when the dye front migrates to the desired position.
| Tip: Tris-tricine gels separate low MW proteins. (<20kDa) better than Tris-glycine gels. |
Membrane Transfer
Please note: PVDF membranes (or PSQ membranes with 0.22um micropores for targets less than <30 kDa) are strongly recommended.
-
Soak membranes in methanol for 30 seconds before moving to transfer buffer.
-
Soak the filter papers and sponges in transfer buffer.
-
Sequentially assemble the transfer constituents according to the illustration shown on the next page (Figure 2), and ensure no bubbles lie between any of the layers. Apply semi-dry or wet transfer systems according to the instructions of the blotting apparatus manufacturer.
Immunoblotting
-
Following transfer, wash the membrane twice with distilled water.
-
Gently mark the bands of the MW ladder on the membrane using a pencil.
-
If desired, stain the membrane with commercial Ponceau red solution for 30 seconds to visualize protein bands, then wash away Ponceau red solution with generous amounts of 1x TBST.
-
Block with 1x TBST containing (2–5%) non-fat dry milk (or 1–5% BSA for the detection of phospho-epitopes) with constant rocking for 1 hour or overnight at 4°C.
-
Dilute primary antibody in blocking solution with a starting dilution ratio of 1:1000. (Optimal dilutions should be determined experimentally with a dilution series.) Incubate the membrane with primary antibody for 1 hour (or overnight at 4°C) on a benchtop rocker.
-
Wash membrane three times with 1x TBST for 10 minutes each.
-
Incubate the membrane with a suitable HRP-conjugated secondary antibody (recognizing the host species of the primary antibody), diluted according to the instructions. Incubate for 1 hour with constant rocking.
-
Wash membrane three times with 1x TBST for 10 minutes each.
| Tip: Do not let the membrane dry at any stage of the blotting process. |
Signal Detection
-
Prepare ECL substrate according to the manufacturer’s instructions.
-
Incubate the membrane completely with substrate for 1–5 minutes (adjust time for more sensitive ECL substrates, e.g., SuperSignal West Femto Chemiluminescent Substrate [Pierce]).
-
Expose the membrane to autoradiography film in a darkroom or read using a chemiluminescence imaging system.
-
Line up the developed film in the correct orientation to the blot and mark the bands of the MW ladder directly onto the film. It is also advisable to add notes such as lane content, film exposure time, and ECL properties.
| Tip: Use multiple exposure lengths to determine the optimal exposure time. Use fluorescent markers and clip the top right corner of your film as a guide for blot film orientation. |